Difference between revisions of "NCSAETK2017/setup"
(→Webcast) |
(add Thursday recording) |
||
| Line 19: | Line 19: | ||
[[Image:2017 North American Einstein Toolkit School - Day 3.mp4.jpg|thumb|left|360px|[https://www.youtube.com/watch?v=PzB7ZN0w2sw Wednesday recording] (click on text, not image)]] | [[Image:2017 North American Einstein Toolkit School - Day 3.mp4.jpg|thumb|left|360px|[https://www.youtube.com/watch?v=PzB7ZN0w2sw Wednesday recording] (click on text, not image)]] | ||
</li> | </li> | ||
| + | --> | ||
| + | <br/> | ||
<li style="display: inline-block;"> | <li style="display: inline-block;"> | ||
| − | [[Image: | + | [[Image:2017_North_American_Einstein_Toolkit_Workshop_-_Day_1.mp4.jpg|thumb|left|360px|[https://www.youtube.com/watch?v=9xUWzB6hM-Y Thursday recording] (click on text, not image)]] |
</li> | </li> | ||
| + | <!-- | ||
<li style="display: inline-block;"> | <li style="display: inline-block;"> | ||
[[Image:screenlayoutMockUp.png|thumb|left|360px|[https://www.youtube.com/watch?v=yLmPN_kcXkU Friday recording] (click on text, not image)]] | [[Image:screenlayoutMockUp.png|thumb|left|360px|[https://www.youtube.com/watch?v=yLmPN_kcXkU Friday recording] (click on text, not image)]] | ||
Revision as of 12:33, 4 August 2017
This page contains information on how to set up your laptop to participate locally and remotely. Please read all of it since some important information is near the end.
Contents
Remote participation
Webcast
The school lectures (July 31 to August 2) will be webcast live via Youtube. The link to the webcast will be made available here on the first day of the school and on each successive day.
-
 Monday recording (click on text, not image)
 -
 Tuesday recording (click on text, not image)
 -
 Thursday recording (click on text, not image)
If you are experiencing problems please email the school and workshop organizers at etk2017@ncsa.illinois.edu or the slack channel (join).
You can download the lecture material to follow along.
Webconferencing
During the workshop (August 3 to August 4) live, interactive audio/video connectivity via webconferencing software may be available for part of the proceedings. For connection details, please contact etk2017@ncsa.illinois.edu.
Communication during the lectures and exercises
For questions, audience members will use a separate channel within the ncsa-etk2017 team, https://ncsa‑etk2017.slack.com, to which you can sign up for here. Please allow one or two days for your sign up request to be processed. Support teams will field and manage those questions, forwarding some or all of them to the presenter. The presenter may, of course, also opt to watch the Slack channel. Due to the potentially large number of participants, there is no plan to allow participants to ask questions verbally.
Broadcast Delay
There is a 15 to 30 second delay from the time a presenter speaks until the audience hears the audio. As such, presenters are advised to ask the audience to submit questions as they occur. Depending on the nature of each question, support staff will relay it to the presenter either immediately or when the presenter asks for questions from the audience.
School and workshop mailing list
Please sign up for the school and workshop mailing list here. Using it you can reach all currently signed up participants. We will use for school wide announcements.
Pre-school setup
Handouts
Please familiarize yourself with the information in the handouts before the school starts so that you can begin participating right away. This handout provides details on how to log into Blue Waters. This handout describes how to log into the jupyter servers we will use.
Required Software
- a web broswer with JavaScript support to run jupyter notebooks. Try it here.
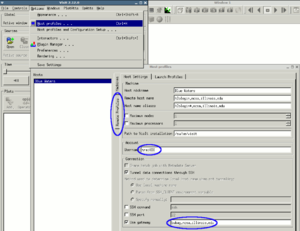
- VisIt 2.12.3. VisIt is a visualization tool that can read Cactus' 3D output. It is available for MacOS, Linux and Windows and can be downloaded here. To use it with BlueWaters you will have to add as the "gateway" in the host settings after importing the National Center for Supercomputing Applications/BlueWaters profile from the remote profiles.
- ssh. ssh is required to log into the workshop machines. Many Linux distributions and MacOS install it by default so you may not have to install anything. In case you need to install it:
apt-get install openssh-clientfor Ubuntu etc- PuTTY for Windows
- the system's ssh is ok for OSX
Optional Software (for fallback)
- VirtualBox is virtualisation software that we use to provide a known software stack. It is available for MacOS, Linux and Windows. Please follow the instructions here to download a copy for MacOS Linux, and Windows.
Some Linux distributions have VirtualBox in their repositories in that case please do: apt-get install virtualbox-dkms virtualbox-qt
- the (currently still subject to changes) ETK2017 virtual machine image(2GB to dowload, requires 8GB of disk space, 1GB of RAM for VM) can be found here.
- please see our virtual machine setup page for further instructions.
Recommended software
- rsync which is an efficient file transfer utility. When using your BlueWaters training account, please add
-e "ssh traiXXX@bwbay.ncsa.illinois.edu"to your command line. It can usually be installed from your distributions package repository (Linux) via apt-get install rsync or you can use the system provided on (MacOS). - sshfs lets you access files on a remote machine accessible via ssh as if they were in a local disk. It is available in one form or the other for MacOS, Linux and Windows. To install please use
To use sshfs with BlueWaters you need to do the following:
mkdir ~/bw
sshfs -o ssh_command="ssh traXXX@bwbay.ncsa.illinois.edu ssh" h2ologin:/ ~/bw
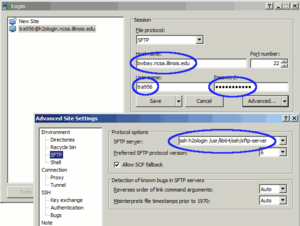
- WinSCP is a Windows only GUI for scp that lets you copy files to / from clusters. To use it with Blue Waters please add "ssh h2ologin /usr/lib64/ssh/sftp-server" in the "SFTP server" box in the advanced settings. You can use this saved WinSCP.ini to import the correct settings.
Using precompiled ET on training accounts
- add the following to your ~/.bashrc:
export PATH=$PATH:/u/training/tra950/openmpi/bin
export LD_LIBRARY_PATH=$LD_LIBRARY_PATH:/u/training/tra950/openmpi/lib
- make a folder called simulations in your /scratch/training/@USER@ folder
(@USER@ is the name of your training account):
$ cd /scratch/training/@USER@
$ mkdir simulations
- copy over the precompiled ET from a pre-existing installation:
$ cd
$ cp /u/training/tra950/cactus.tar.gz .
$ tar -xf cactus.tar.gz
you should now have a folder cactus/Cactus containing the ET!
- make a par file folder and copy the following parameter files over:
$ cd
$ mkdir ET_workshop_par
$ cd ET_workshop_par
$ cp /u/training/tra950/ET_workshop_par/*.par .
- get the ET thornlist and add CactusExamples/WaveMoL and CactusExamples/IDWaveMoL
$ cd
$ mkdir ET_workshop_TL
$ cd ET_workshop_TL
$ cp /u/training/tra950/ET_workshop_TL/*.th .
uncomment CactusExamples/WaveMoL and CactusExamples/IDWaveMoL in the thornlist
$ ET_workshop_TL/ETK_workshop_2017.th
$ cd cactus
$ ./GetComponents ~/ET_workshop_TL/ETK_workshop_2017.th
Don't update existing components and build again after you have checked out WaveMol
- build the Einstein Toolkit:
$ cd ~/cactus/Cactus
$ simfactory/bin/sim build etk_workshop --thornlist=thornlists/ETK_workshop_2017.th --machine=bluewaters-training --runscript=simfactory/mdb/runscripts/bluewaters-training.sh --submitscript=simfactory/mdb/submitscripts/bluewaters-training.sub
- update the local default definitions file:
$ cactus/Cactus/simfactory/etc/defs.local.ini
user = your_training_account
email = your_email
allocation = this_can_be_anything
Leave basedir and sourcebasedir as they are.
- create a simulation:
$ simfactory/bin/sim create poisson_test --parfile=~/ET_workshop_par/poisson.par --configuration=etk_workshop --machine=bluewaters-training
- submit a simulation:
Before you submit a simulation, follow the instructions on how to get an interactive job on a compute node in the BW handout.
Then, submit the simulation with:
$ simfactory/bin/sim submit poisson_test --procs 8 --num-threads 4 --machine=bluewaters-training --walltime 0:10:0
- follow the standard output of simulation you just created:
$ simfactory/bin/sim show-output poisson_test --follow --machine=bluewaters-training
Using pyCBC on Bluewaters
First you need to log into BlueWaters while forwarding the GUI connection (X11) via
laptop$ ssh -tY traXXX@bwbay.ncsa.illinois.edu ssh -tY h2ologin
h2ologin$ . ~instr046/pyCBC/bin/activate
(This doesn't work easily with Putty/Windows so you may need to share with your neighbour.)
You can copy the Tuesday afternoon python exercises into your home directory via
cp -r ~instr046/pyCBC/Tuesday_Afternoon2_Huerta ~
cd Tuesday_Afternoon2_Huerta
and run the exercise
python yourfilename
LIGO gravitational wave event GW150914 simulation data visualisation (Wednesday afternoon)
If you want to explore the Einstein Toolkit data for the GW150914 LIGO event, you can experiment with the resources in this section. (This is not as polished as some of the other tutorials, so take it on an "as is" basis!)
First obtain the GW150914.tar.gz file, either from the USB sticks, or from
The files can be found here (1.4 GB): http://ekohaes8.ncsa.illinois.edu/.
Uncompress the file to your local hard drive. Visualise the data using VisIt, using some of the techniques we saw yesterday. There are:
- 2D (xy plane) data files for phi, the metric conformal factor, and Psi4r, the gravitational wave data. Use a pseudocolour plot for these.
- Surface shape files (surface*.vtk) for the apparent horizons (at selected times). Use a mesh plot for this.
There are some hints for how to visualise this type of data at the Einstein Toolkit Gallery GW150914 VisIt tutorial page. Note that we only provide a small number of horizon (VTK) files, so you cannot create the database correlation mentioned in the tutorial page.
It is also interesting to add a "Mesh" plot for phi (set the opacity to 10% for best results) so you can see the mesh refinement used in the simulation.
Play with the data, and ask if you have questions!
